Have you ever been enamored by the intricate details of crocheted decor or animals and wished you could create something just as beautiful? Our beginner-friendly crochet tutorial is here to make that dream a reality.
Explore the exciting world of crochet with us as we cover the basics, important tools, essential techniques, and basic stitches. And the best part? We’ve got free patterns to get you started on your crochet journey. Trust us, once you start, you’ll be hooked on this fantastic hobby.
Uncover the Wonders of Crochet as a Beginner: A Guide to the Basics
Crochet, a needlework technique originating from the French word for “small hook,” allows for the creation of a variety of items using only one tool. From handbags and garments to coasters, baskets, pillowcases, blankets, and stuffed toys, the possibilities are endless. It’s worth mentioning that the weight of the yarn and size of the crochet hook can significantly impact the end result of your project, even if using the same pattern as someone else. The beauty of crochet lies in the simplicity of its basic stitches, which are all that’s needed to get started on beginner-level projects. To help kickstart your crochet journey, we’ve compiled a list of beginner-friendly patterns that you can try today!
Get Started with Crochet: Essential Tools & Materials for Novice Crocheters

Starting with crochet can seem intimidating, but it’s actually a very approachable craft once you have the right tools. To get started, all you need is a crochet hook and some yarn. The market is overflowing with options for both, but as a beginner, it’s best to choose basic supplies that are easy to work with. By selecting the right hook and yarn for your first project, you’ll be setting yourself up for success and a lifetime of crochet enjoyment.
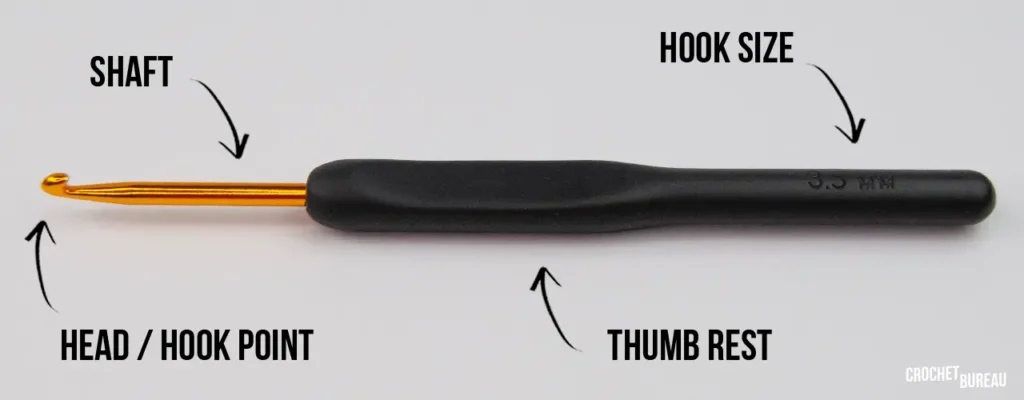
Hooks
Creating beautiful and intricate designs with yarn doesn’t have to be complicated! With the right tool, a crochet hook, the possibilities are endless. Crochet hooks come in various sizes and their terminology and measurement systems can vary based on your location. But don’t worry, just take a look at the image included in this text and you’ll have a clear understanding of the essential components of a crochet hook! Get ready to unleash your creativity and start crafting today.
Selecting the appropriate crochet hook can greatly impact your crafting journey.With a range of materials like plastic, wood, steel, bamboo, and aluminum, it’s crucial to ponder which one fits your style. For those just starting out, aluminum hooks are a favored pick due to their resilience and lightweight nature, making crochet a breeze to learn.
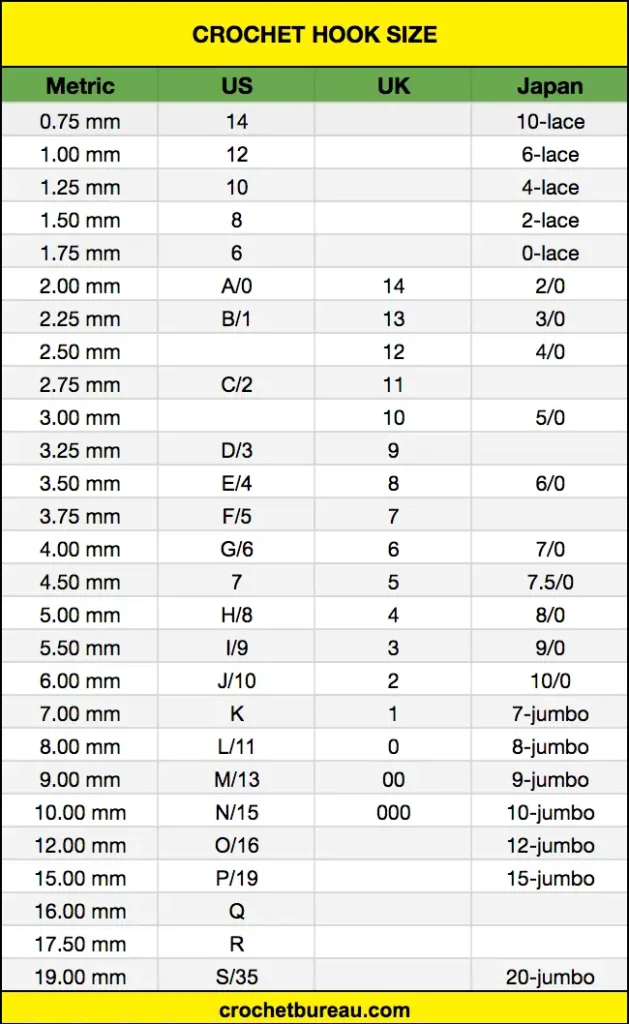
When it comes to determining the size of a crochet hook, the standard measurement unit is millimeters (mm). As a beginner, it’s advisable to opt for a hook size within the 4mm to 6mm range. These medium-sized hooks serve as the ideal starting point to grasp the basic movements and stitches in crochet.
Every crochet hook manufacturer has their unique method of labeling their products. In the United States, hooks are often marked with letters B through S, with the remaining sizes presented in millimeters. Some include both a letter and a number to simplify identification. A conversion chart, useful for reference, is available for the United States, the United Kingdom, and Japan, making it easy to select the right hook size.
Crochet Yarns: A Beginner’s Guide
Crochet yarns are similar to knitting yarns, but they serve a different purpose. They come in a variety of weights, each of which can be used to create different crochet projects. However, it’s important to note that the weight of the yarn refers to its thickness, not its weight.
If you’re new to crocheting, it’s recommended to start with medium-weight yarns. These yarns are smooth, strong, and produce even stitches, making them easy for beginners to work with. Thinner yarns can be more challenging for new crocheters, as it can be harder to gauge the stitches correctly. For a successful experience, opt for light-colored yarns that are easy to see when inserting your hook.
Acrylic and cotton yarns are two of the most popular options for beginners. They come in a wide range of colors, including bright and bold hues, and are lightweight, soft, and strong enough to support your crochet projects. Additionally, these materials typically have excellent stitch definition, allowing you to clearly see your stitches.
Machine washability is also a bonus of using acrylic and cotton yarns. However, it’s important to refer to the yarn labels for specific washing instructions, as they can vary from yarn to yarn.
Raffia yarn is another option to consider for your crochet projects. This type of yarn is perfect for creating summer accessories like beach totes and summer hats, but can also be used to make baskets, plant hangers, bags, and purses.
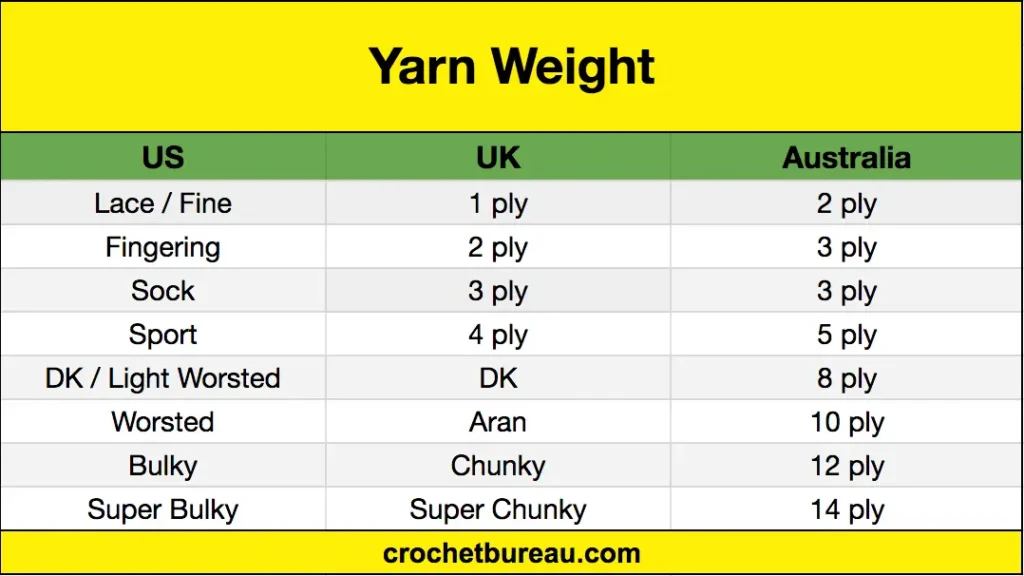
Converting Yarn Weights: A Guide to Understanding Your Chart
When it comes to crocheting, the right yarn weight is crucial. But if you’re working with materials from overseas, the weight measurements may be different. That’s where a yarn weight conversion chart comes in handy.
The chart can help you find a close approximation, even if it’s not an exact match. For instance, if the pattern specifies a light worsted weight yarn, you could use a DK weight or an 8-ply yarn, based on the yarn’s country of origin. Simply refer to the yarn label for further details.
Crochet tools & accessories
Crochet beginners often require more than just a hook and yarn to complete their projects. Here are additional tools you may need to make your first crochet project a success.

Tapestry / darning needle – essential tool
From tapestry to darning, these yarn needles are a must-have for your crochet kit. Their blunt points and large eye make them versatile for all yarns, while varying sizes cater to different project needs. Remember, smaller numbers on the needle equal larger sizes.
Stitch Marker
Keeping track of stitches and rows can be a challenge, but with the use of stitch markers, it becomes much easier. These little tools, often made of plastic, look like a paper clip but are much gentler on your yarn. They help you keep track of your progress, preventing mistakes in your crochet projects with repeating patterns
Scissors
Cutting through yarn requires a sharp blade, making a good pair of scissors an indispensable tool for any crocheter. There are many options on the market, from compact and convenient sets to specialized scissors designed specifically for yarn.
The Correct Way to Hold a Crochet Hook
Pencil grip
To use the pencil grip for crocheting, place your thumb on the wide part of the hook and hold it in place with your index finger, so the throat of the hook faces you. The rest of your fingers are then closed together, with the hook resting on your middle finger.

Knife grip
This approach to holding a crochet hook resembles how you hold a knife while dining. Extend your index finger to the top of the hook and let your thumb support it from one side while the other three fingers secure it from the opposite side.

Maximize Your Crochet Results by Choosing the Right Hook Hold. The Pencil Grip is Operated by Your Fingers, and the Knife Grip is Controlled by Your Wrist. Experiment to Find Your Ideal Method!
How to hold your crochet yarn
Holding the yarn correctly can be a delicate art in crochet. To get the desired tension for your project, you must master the proper way to hold the yarn in your hand.
To begin, take the yarn in your non-dominant hand and place it in the center of your palm. Tangle the tail of the yarn between your pinky and ring finger. Then, carefully wrap the end of the yarn over your index finger. If the tension seems too loose, simply wrap the yarn around your index finger once more.

Some people prefer to keep the yarn under their palm while others like to have it rest on top. Experiment with these different methods until you find the one that feels most comfortable to you.
For particularly slippery yarns such as cotton or lace, you can try wrapping the yarn around both your pinky and index finger for added stability.
Remember, the key to a successful crochet project is finding the right tension. The yarn should flow easily and smoothly through your fingers, so avoid pulling too hard.
How to start crochet
Starting Crochet, A Journey into Fiber Art
Are you eager to dive into the world of crochet? Before we move on to the more complex stitches, let’s first learn how to create a proper foundation. The key to successful crochet lies in two techniques – the slip knot and the magic ring.
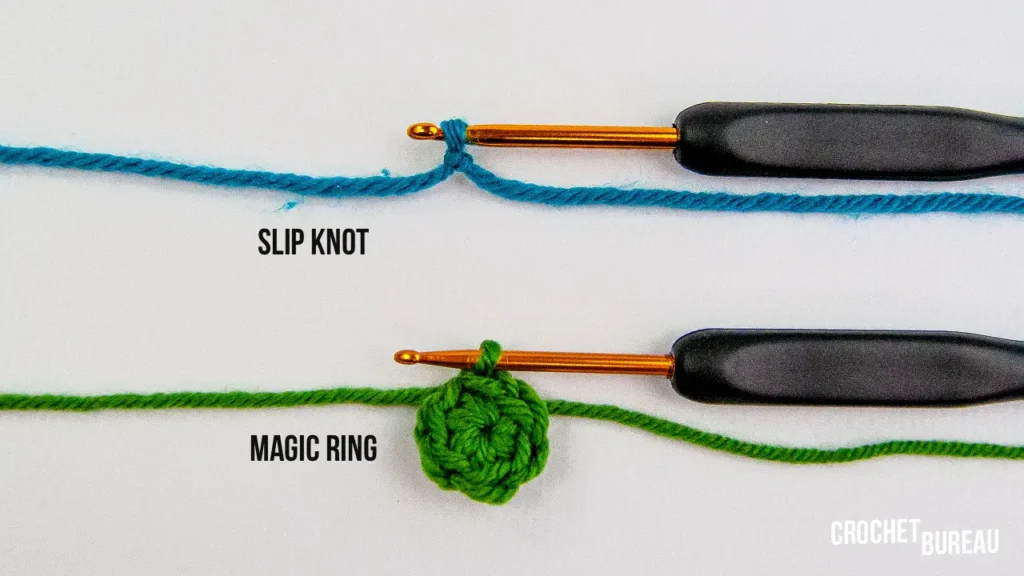
The Slip Knot
This is where it all starts, connecting the crochet hook with the yarn. To create a slip knot, form a loop with the end of the yarn and place it on the hook. Tighten it to secure the knot. There are multiple ways to create this knot, and you can watch videos that demonstrate a few different methods.
The Magic Ring
Once you have mastered the slip knot, it’s time to turn your attention to the magic ring. Often used for crocheting circles, this adjustable loop can help you create seamless designs with its “drawstring”. The magic ring is popular for starting amigurumi projects and granny square patterns. To use it, follow the pattern instructions and make the necessary single crochet stitches into the ring, then tighten the yarn end to close the loop.
By familiarizing yourself with these two essential techniques, you’ll be well on your way to creating beautiful crochet pieces.
Basic crochet stitches
Starting on your crochet journey, you’ll need to familiarize yourself with the fundamental stitches. Below are several stitches and crochet patterns perfect for beginners.
Chain stitch (CH)
The chain stitch, or “ch” in patterns, is the first and easiest stitch to learn. This stitch acts as a base for other stitches to be added in the next row or round and is often referred to as a foundation chain. Additionally, chain stitches are used between other stitches to create spaces, commonly referred to as chain spaces in granny square patterns. In many projects, chain stitches serve as the starting chain or turning chain (tch) at the beginning of a row or round.
To make a chain stitch:
1. Loop the working yarn over the hook from back to front;
2. Pull through the loop to form a new loop;
3. Repeat to create more chain stitches as indicated by the pattern.
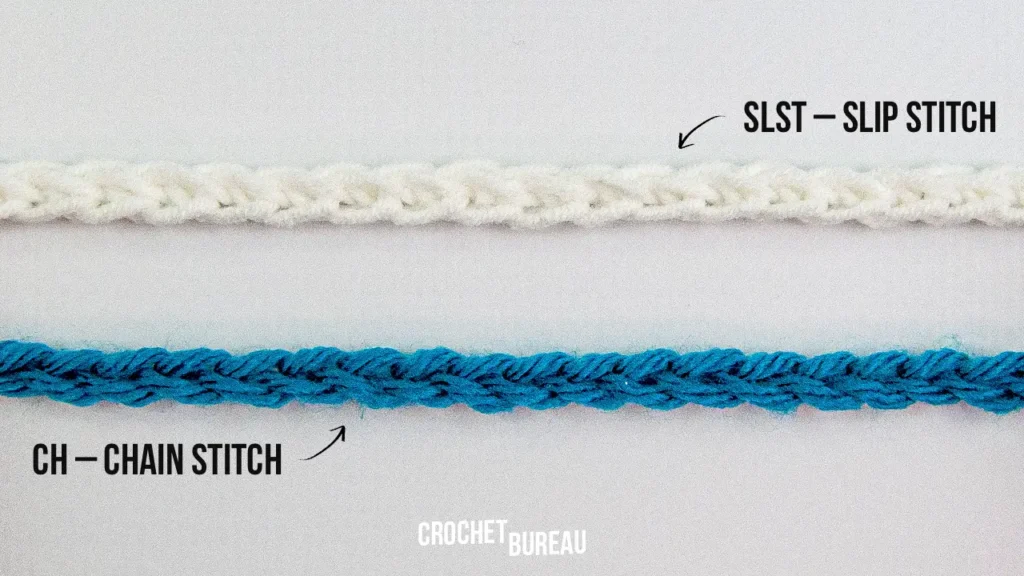
Slip stitch (SLST)
The slip stitch, “sl st” in patterns, is a small and versatile stitch mostly used to finish rounds or join two crochet pieces together, especially in granny squares. Its short length and lack of height make it primarily a decorative stitch in surface crochet.
To create a slip stitch:
1. Insert the hook into the next stitch;
2. Loop the working yarn over the hook from back to front;
3. Pull through both the stitch and the loop on the hook;
4. Repeat to make slip stitches as requested by the pattern.
Single crochet stitch (SC)
The single crochet stitch, written as “sc” in patterns, is one of the most commonly used stitches in crochet. Its tight, short loops make it ideal for projects that require a firm, durable fabric such as amigurumi animal patterns.
To make a single crochet stitch:
1. Insert the hook into the next stitch;
2. Loop the working yarn over the hook from back to front;
3. Pull through the stitch to create a new loop;
4. Loop the yarn over again;
5. Pull through both loops on the hook to complete a single crochet stitch.
6. Repeat to make as many single crochet stitches as indicated by the pattern.
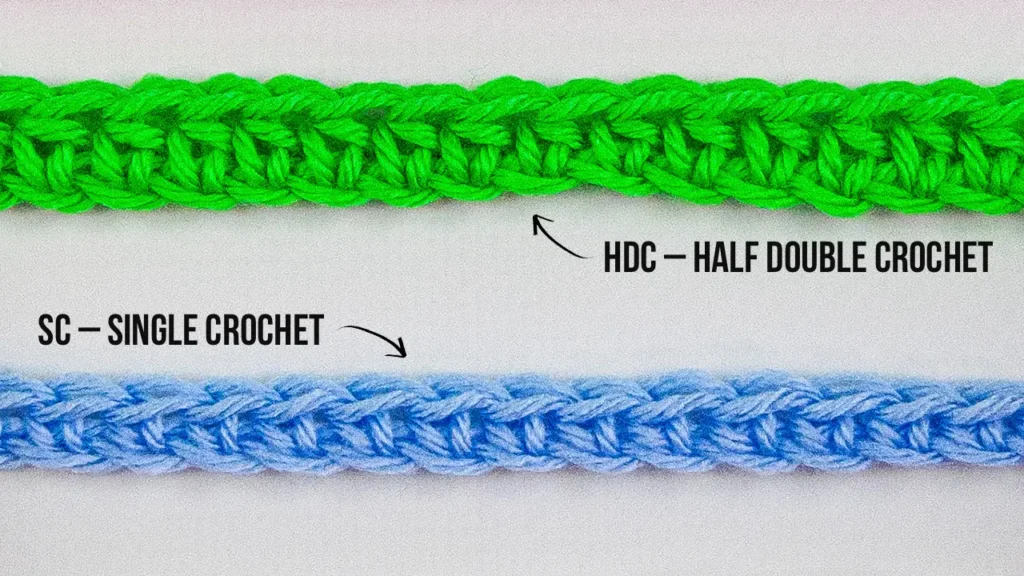
Half double stitch (HDC)
The half double crochet stitch, denoted as “hdc” in patterns, is a stitch that is slightly taller than a single crochet stitch, but shorter than a double crochet stitch. HDC produces looser stitches compared to SC and is ideal for making warm crochet fabrics such as sweaters and blankets. Since HDC stitches are quick to create, they are a great choice for projects that need to be completed quickly.
Instructions for the half double crochet stitch are as follows:
1. Wrap the yarn over the hook by looping it over from the back to the front.
2. Insert the crochet hook into the next stitch.
3. Wrap the yarn over the hook again.
4. Pull the yarn through the stitch to create a third loop on the hook.
5. Wrap the yarn over the hook again.
6. Pull the yarn through all three loops to create the half double crochet stitch.
7. Repeat these steps to create the desired number of HDC stitches, as specified in the pattern.
Double crochet stitch (DC)
The double crochet stitch, indicated as “dc” in patterns, is a popular basic stitch that is larger than the half double crochet stitch. It is commonly used for projects like granny squares, crochet blankets, filet crochet, corner-to-corner crochet, and many others.
Instructions for the double crochet stitch are as follows:
1. Wrap the yarn over the hook by looping it over from the back to the front.
2. Insert the crochet hook into the next stitch.
3. Wrap the yarn over the hook again.
4. Pull the yarn through the stitch to create a third loop on the hook.
5. Wrap the yarn over the hook again.
6. Pull the yarn through the first two loops on the hook.
7. Wrap the yarn over the hook again.
8. Pull the yarn through the last two loops to create the double crochet stitch.
9. Repeat these steps to create the desired number of DC stitches, as specified in the pattern.

Treble crochet stitch (TR)
The treble crochet stitch, denoted as “tr” in patterns, is also known as the triple crochet stitch. It is the tallest among the six basic stitches and produces a loose, lacy fabric that is great for light projects.
Instructions for the treble crochet stitch are as follows:
1. Wrap the yarn over the hook by looping it over from the back to the front.
2. Wrap the yarn over the hook again to create a second loop.
3. Insert the crochet hook into the next stitch.
4. Wrap the yarn over the hook again.
5. Pull the yarn through the stitch to create a fourth loop on the hook.
6. Wrap the yarn over the hook again.
7. Pull the yarn through the first two loops on the hook.
8. Wrap the yarn over the hook again.
9. Pull the yarn through the next two loops on the hook.
10. Wrap the yarn over the hook again.
11. Pull the yarn through the last two loops on the hook to create the treble crochet stitch.
12. Repeat these steps to create the desired number of TR stitches, as specified in the pattern


